
Carrd buttons are one of the easiest ways to make your website more interactive and easier to navigate. In this tutorial, you’ll learn how to add and customize buttons, link them to sections and forms, fix common button problems, and create more advanced effects.
How to Add a Button in Carrd
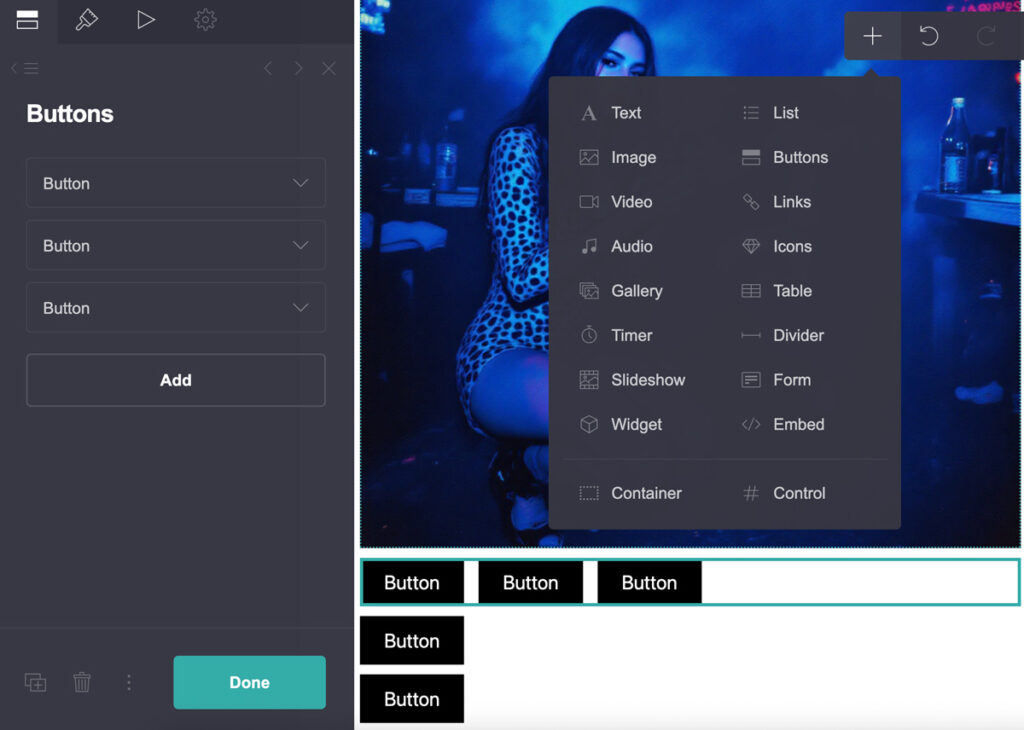
To use the Button element in Carrd, start by choosing Button from the Plus menu in the top-right corner. The Button element will appear on the page, and the left-hand menu will give you several options for customizing it.
How to Add a Link to a Carrd Button
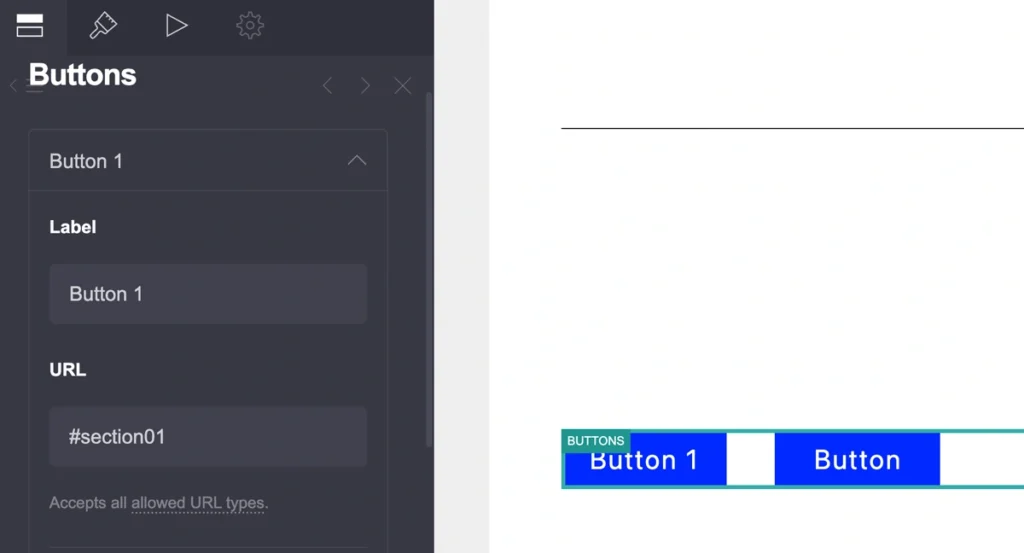
Add a URL – enter the URL where users will be taken when they click the button. Under the URL field, you can access different supported URL types. Besides standard website URLs, you can use email addresses, phone numbers, and other actions such as browser:back. You can also link to sections using options such as section:previous, scroll points, or clipboard actions.
You can also change the label by replacing the default button text with your desired label. It is also possible to set an on-click action which is an optional feature available only to paid users. You can also change the button design and colors here or you can click on the Appearance icon in top menu.
To add more buttons just click Add below the last Button element.
How to Customize Carrd Buttons
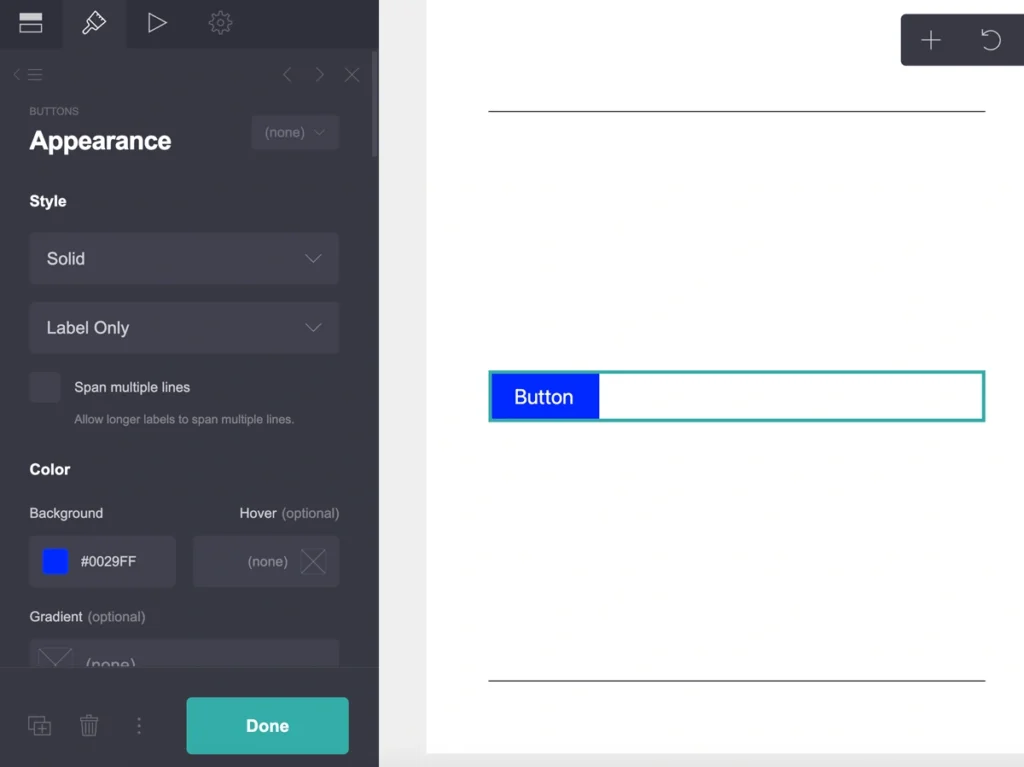
To change the button’s appearance and design, click the second icon, the Brush, in the left-hand menu. It allows you to customize the following:
- Button style – choose between Outline, which displays only the border, and Solid, which fills the button with color.
- Add an icon – add an icon alongside the button label or use the icon without a text label.
- Span multiple lines – allows the button label to wrap onto multiple lines instead of staying on a single line. This can be useful when you have a longer button label or when the button is narrower, particularly on mobile devices.
- Change colors – customize the button, hover, label, and border colors. You can also add a gradient. Additional options allow you to add a shadow and control its angle, size, distance, and blur.
- Set the width and height – adjust the dimensions of the button.
- Choose corner rounding – adjust the corner radius or turn it off for square corners.
- Customize typography – choose the font for the button label, adjust its size and weight, line spacing, letter spacing, text appearance such as uppercase, lowercase, or small caps, and set the text alignment.
- Set the layout – choose between a column or row layout and adjust spacing, margins, and alignment.
- Adjust mobile settings – choose Auto or Manual settings. Manual settings let you customize the layout, size, letter spacing, spacing, and margins specifically for mobile devices.
How to Animate Buttons in Carrd
The next section, represented by the Play icon in the left-hand menu, contains the animation settings. You can choose what happens when the button becomes visible to the user on the page. Typical animations include fade, bounce, blur, and similar effects. You can also set an animation for the hover state, such as making the button grow, fade, or shrink when the user moves the cursor over it.
The last icon contains additional settings. These options are available only to paid users and are intended mainly for more advanced customization, so I will not cover them in this beginner’s guide.
Keep your primary buttons visually consistent throughout your site. Using too many different styles can make the design feel cluttered.
How to Put Buttons Side by Side in Carrd
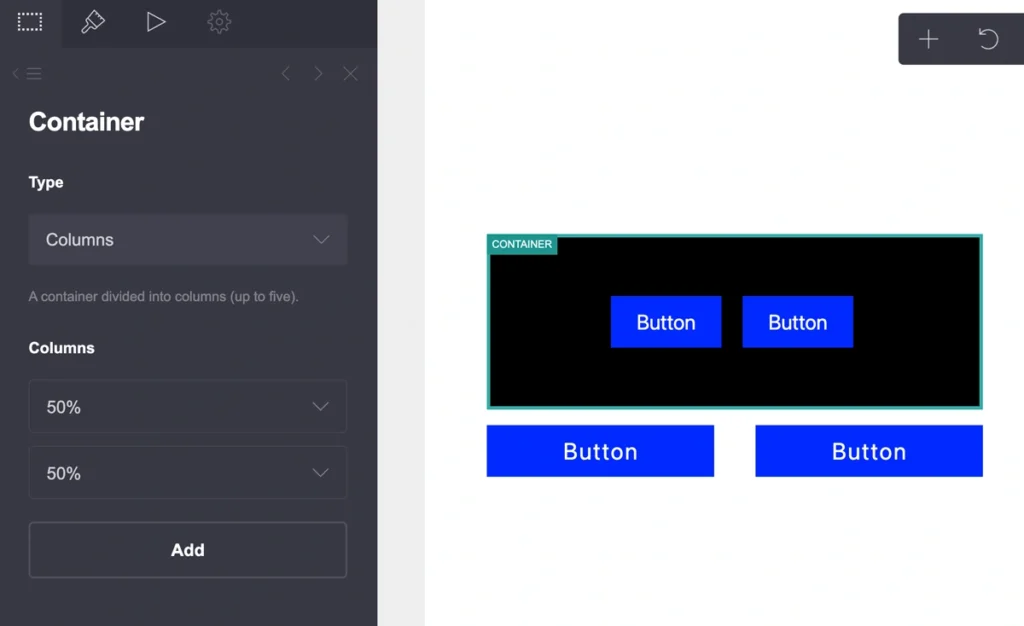
To put one button next to another, you need to use a container. Follow these steps:
- In the top-right menu, select the Plus (+) icon and choose Container. Once it appears on the page, click on it. In the left menu, change the Type from Default to Columns. You can adjust the column size by changing the percentage. By default, it is set to 50%.
- Go to the top-right menu again and select Button. The button should appear in the first, left column.
- Go to the top menu again and select Button. A second button will be added to the right column.
- If the buttons are not placed where you want them, simply drag and drop them into the desired position.
Another easy way to add multiple buttons is to use the Add option in an existing Button element. You can find Add on the first screen of the left menu, below the last button. This lets you add another button without creating a new Button element.
By default, the buttons may appear horizontally. To change their orientation, click the Brush icon in the left menu and scroll down to Layout. You can then change the layout to Row or Column, depending on how you want the buttons to be arranged.
How to Center a Button in Carrd
To change the alignment of a specific button, follow these steps:
- Select the button you want to edit.
- In the left menu, click the Brush icon.
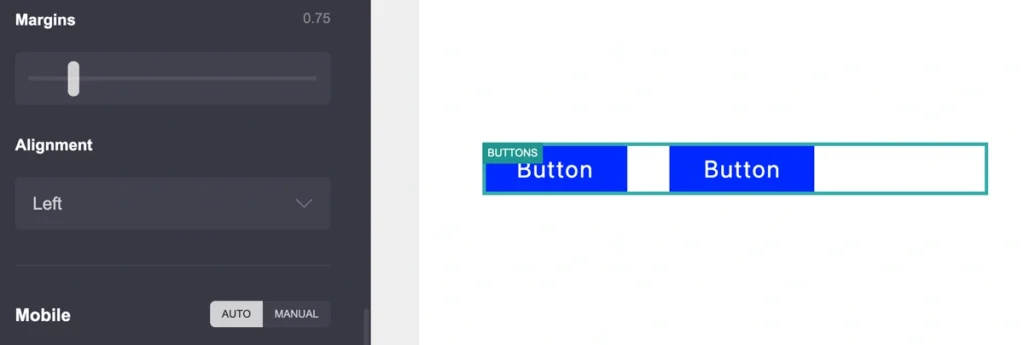
- Scroll down to Layout. Here, you can adjust the spacing and margins, as well as change the layout from Row to Column and vice versa as you have find out in previous section.
- The last option is Alignment. You can leave it set to Auto, or choose Left, Center, or Right alignment.
- To center your button, select Center under Alignment.
How to Fix Button Spacing on Mobile
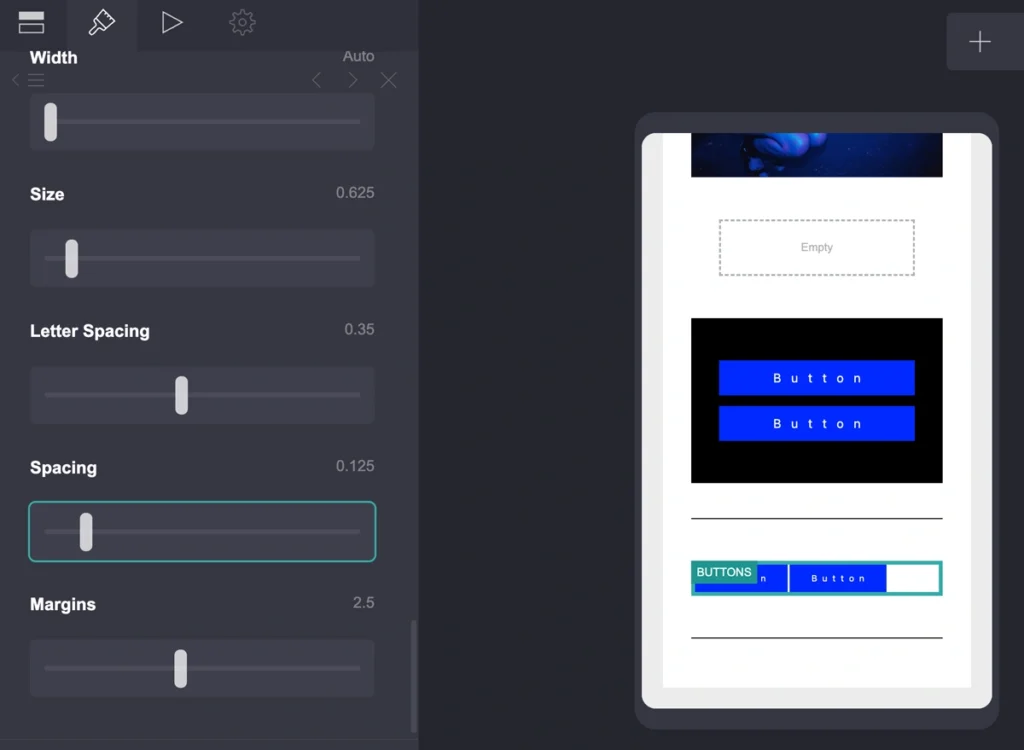
To fix button spacing problems on mobile, follow these steps:
- Select the button you want to edit.
- In the left menu, click the Brush icon at the top.
- Scroll down to the Mobile section.
- Change Auto to Manual.
- You can now adjust these settings: size, letter spacing, spacing, and margins.
- To see the changes, switch to Mobile view by clicking the Mobile icon in the top-right menu.
How to Link a Button to a Section in Carrd
Before you can link a specific button to a section, you need to have both the section and the button on the page.
In the top-right menu, select the plus icon and then choose Buttons. Place it where you want it and add any other elements you want to appear around it.
To add a new section, go to the top-right menu, click the plus icon, and then select #Control. A new section element highlighted in green will appear on the page. You can drag and drop it wherever you need it. All elements after it will belong to the this new section. In the left menu, you can change its name. This name is crucial for creating the button link.
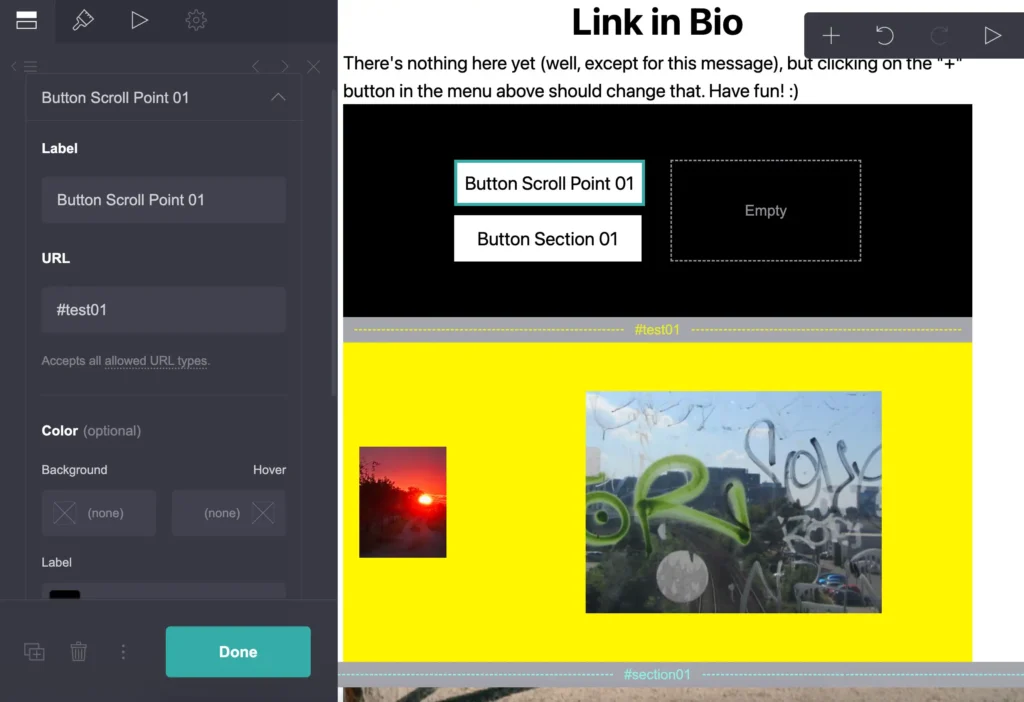
Click the button you want to link to your new section. In the left menu, on the first screen, you can enter the URL. The available formats are:
- #section-name
- section:next
- section:previous
- section:first
- section:last
Test the link by saving and publishing the page under a Carrd subdomain.
How to Add Buttons to a Footer in Carrd
If you want to have a footer with buttons linking to different sections or scroll points, the process is similar to the previous one.
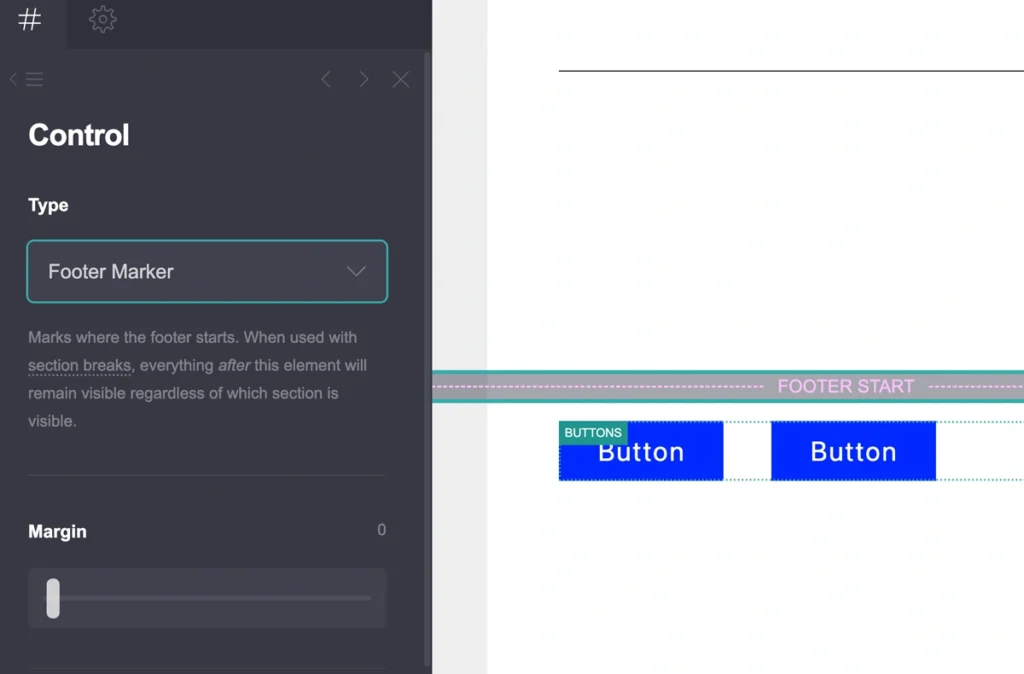
- Start by adding your sections, including the header and footer. It is better to have your page design and content ready before doing this. Click the plus icon in the top-right menu and select #Control.
- Add as many sections or scroll points as you need and give them appropriate names. Use sections if you need to hide some elements of the site. Use scroll points if you want to link to a visible part of your site – for example, the user clicks specific button in the menu in hero sections and they are moved further down the site, where you write about services, offer contact details, etc.
- Change the type of the first and last sections from Section Break to Header Marker and Footer Marker. Don’t insert sections break into your Header and Footer.
- Once you have added all your sections and divided your page into sections, you can add buttons to your footer if you haven’t already. Go to the top menu, click the plus icon, and add a Button element.
- Click the button and set the correct URL in the left menu. I mentioned the available URL formats in the previous section.
- When you are ready, click the Save icon in the top-right corner and publish your site under a Carrd subdomain. Then, test the buttons and check that everything works correctly.
How to Use Buttons With Forms in Carrd
To use forms in Carrd, you will first need to add sections as described in the previous tutorial.
- Start by designing your page and insert your buttons wherever you want them to appear.
- Add a Form element to the page. You can place the form in the section where you want visitors to use it.
- Click the form to edit its settings in the left menu. By default, Carrd provides a Contact form, which you can use to collect messages from visitors.
- You can also change the form type to Sign Up if you want to collect email addresses. To use the Sign Up form, you will need an account with a supported email marketing or newsletter provider and connect it to Carrd.
- You can add different forms to separate sections of your page. For example, you could have a contact form in one section and a newsletter sign-up form in another.
- Once your forms are set up, you can link your buttons to the appropriate sections using the URL formats mentioned in the previous section. For example, you can use #contact to make a Contact button take visitors directly to your contact form.
- Save and publish your page under a Carrd subdomain and test each button and form to make sure everything works correctly.
How to Fix Carrd Buttons That Aren’t Working
If your Carrd button isn’t working as expected, there are a few things you can check before publishing your site.
- Check the URL – Make sure the URL or section link is entered correctly. If you are linking to a section, check that the section name matches the name used in the button URL.
- Check the section name – If you are using a link such as #contact, make sure the corresponding section is actually named contact.
- Check the button settings – Click the button and make sure the correct action or URL is selected in the left menu.
- Test the button in the published version – Some Carrd links may not behave exactly as expected while editing. Save and publish your site, then test the button on the live page.
- Check external links – If your button links to another website, make sure you have entered the complete URL, including https://.
- Check mobile view – If the button works on desktop but not on mobile, switch to Mobile view and check its size, position, and spacing.
If the button still doesn’t work, try removing the link and adding it again. Then save and republish the page before testing it again.
Can You Create Advanced Button Effects in Carrd?
Yes, you can create more advanced button effects in Carrd, but some of them require more complex settings and techniques than the basic button options covered in this guide.
You can create effects such as hover animations, transitions, custom styling, and other interactive button effects. I will cover these more advanced techniques in separate Carrd tutorials, where I will explain how to create and customize each effect step by step.
Use clear, action-oriented labels so visitors immediately understand what will happen when they click a button.
Conclusion
Carrd buttons are simple to add, but with the right settings, you can use them for much more than basic links. From linking to sections and forms to creating mobile-friendly layouts, these options give you more control over how visitors navigate your website.
Once you understand the basic button settings, you can start experimenting with more advanced effects and interactions. I will cover these techniques in more detailed Carrd tutorials.