
This Carrd sections tutorial explains what Carrd sections are, how to use them, and how to link them to other elements. I’ll also show you how to create a header and footer using sections, and when to use scroll points instead of sections. At the end, I’ll share some additional tips to help you organize your sections in a clear and logical way, as well as troubleshoot some common section-related issues.
What Are Carrd Sections?
Carrd sections let you divide a one-page website into separate areas that visitors can access through links or navigation buttons. Instead of placing all of your content on one long page, you can create separate sections for things like About, Services, Portfolio, or Contact.
In Carrd, sections are created using the Control element. When you add a Control, you can choose Section Break and give the section a unique name or ID. This ID can then be used to link buttons, text, or other elements directly to that section.
For example, you could create an about section and link a navigation button to #about. When a visitor clicks the button, Carrd opens the corresponding section instead of simply scrolling to a location on the page.
Sections are especially useful when you want to create a website that feels like it has multiple pages while keeping everything within a single Carrd site. You can use them for navigation menus, portfolios, landing pages, personal websites, and other one-page designs.
It is also important to distinguish sections from Scroll Points. Sections are useful when you want to divide your website into separate navigable areas, while Scroll Points are better when you simply want a link to move visitors to a specific position within the same page. I’ll explain the difference in more detail later in this guide.
How to Add Sections in Carrd
You can start by opening your Carrd editor and following these steps:
- Select the Plus (+) icon in the top-right menu and choose Control at the bottom of the menu.
- A new dashed green line will appear on your page. If this is your first section, Carrd will automatically name it #section01. You can reposition the Control element at any time by simply dragging and dropping it wherever you want on the page.
- Click the Control element to open its settings in the left-hand menu. Here, you can change its type and name, add a title, and adjust other options, such as hiding the header or footer, disabling auto-scroll, excluding the section, or redirecting visitors when the section opens.
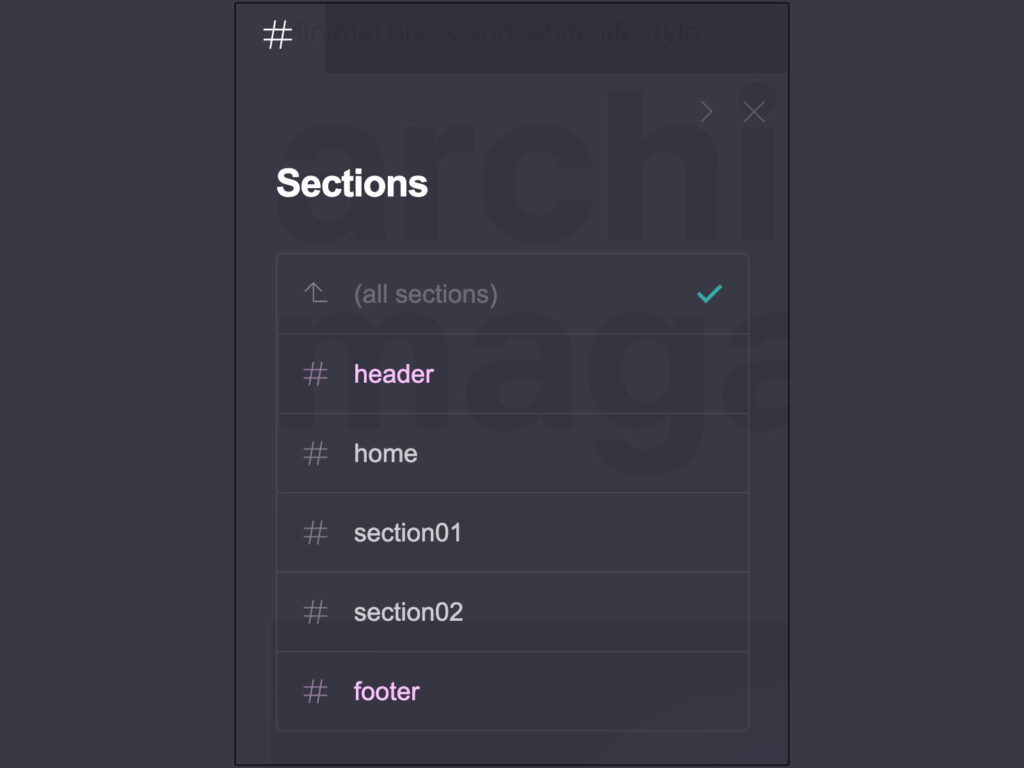
You can also switch the editor to display your page as separate sections instead of showing it as one continuous page with dashed Control lines. This can make it easier to navigate and work with more complex Carrd layouts.
The left-hand menu also includes some additional settings that are only available with Carrd Pro Plus. Some of these advanced options may require basic knowledge of HTML, CSS, or JavaScript.
You can also check out my post Carrd tutorial for beginners where I explain basics how to use this web builder.
How to Link Sections in Carrd
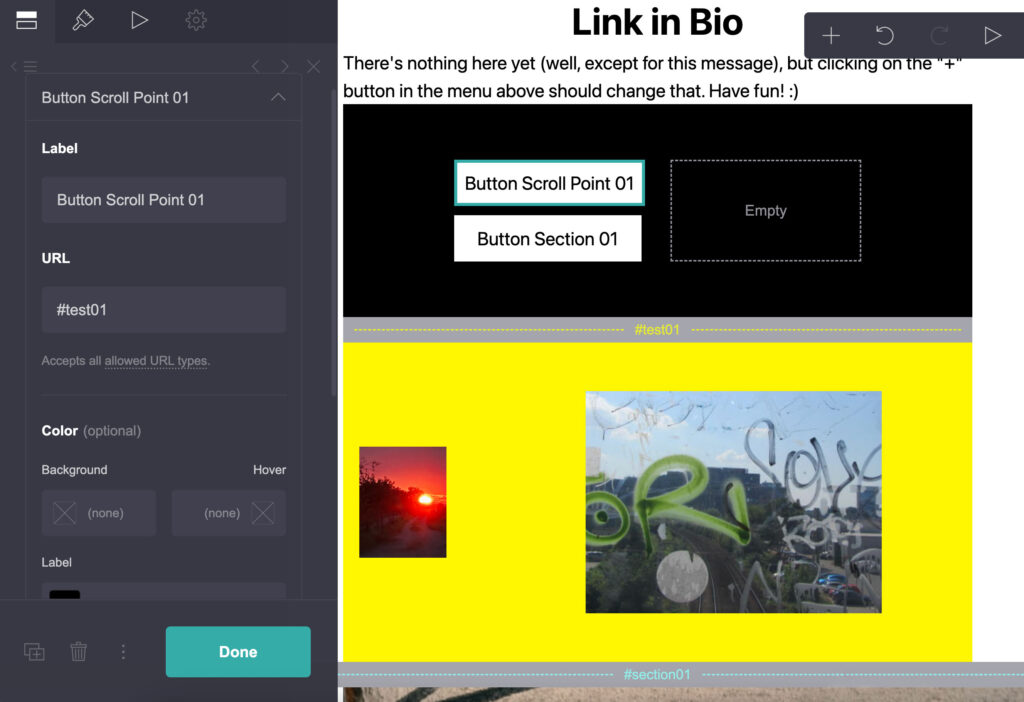
If you want to link specific elements, such as buttons, text links, or images, to separate sections of your Carrd site, follow these steps.
1. Create your navigation
First, design your page and add the elements you want to use for navigation. It is common practice to place navigation buttons or text links in the hero section, which is the first screen visitors see when they enter your site. For example, you could have four buttons: About, Services, Portfolio, and Contact.
2. Add your section content
Next, create the content for each section. You could add information about yourself in the About section, list your services, showcase your work in the Portfolio section, and add a contact form to the Contact section.
3. Add your sections
Once your content is ready, click the Plus (+) icon in the top-right menu and choose Control.
Your first section will appear as a dashed green line on the page. You can add another section by following the same steps. Alternatively, click an existing section and select the Plus (+) icon next to the bin icon at the bottom of the left-hand menu. This will duplicate the section directly below it using the same name.
4. Name and arrange your sections
You can easily move sections using drag and drop. Make sure to give each section a unique and descriptive name. For example, you could use #about, #services, #portfolio, and #contact. Avoid using the same name for multiple sections, as each section should have its own unique ID.
5. Add links to your navigation
Now go back to your navigation buttons or text links in the hero section. Click an element and enter the corresponding section ID in the URL field. For example, enter #about for your About button. Repeat the process for the other buttons and links.
You can use the same method to link images or other elements to your sections.
6. Save and test your site
Once you have added all the links you need, save and publish your site. You can publish it to a Carrd subdomain first if you want to test that all your section links work correctly.
How Carrd Section Breaks Work
A Section Break tells Carrd where one section of your website ends and another begins. It is created using the Control element and acts as a divider between different parts of your site.
For example, imagine your page is structured like this:
Hero → About → Services → Portfolio → Contact
You can add a Section Break before each of these areas and give each section its own ID, such as #about, #services, #portfolio, and #contact.
When a visitor clicks a link such as #about, Carrd knows which section to open and displays the content assigned to that section. This allows you to create a website that feels more like a multi-page site, even though all the content is part of the same Carrd site.
Section Breaks are therefore useful when you want visitors to navigate between different areas of your website without creating completely separate pages.
Carrd Header and Footer Markers
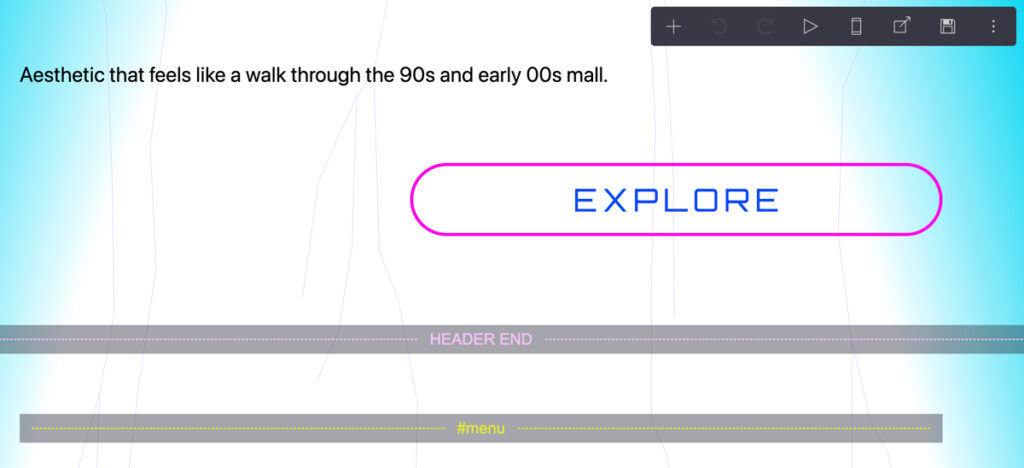
Creating a header and footer in Carrd follows a similar workflow to the one described in the previous section about How to Link Sections in Carrd. The main difference is that instead of using a regular Section Break, you use Header Marker and Footer Marker for the elements you want to keep visible across your sections.
Headers and footers are essentially static parts of your website. They remain visible when visitors navigate between your sections, allowing them to access your navigation, logo, contact information, or other important elements from anywhere on the site.
1. Create your header content
Make sure your design and content are ready, then add a new Control element using the Plus (+) icon in the top menu. Place it directly after your hero section.
Your hero section will usually contain elements such as your logo, navigation buttons, images or a gallery, and a CTA button.
2. Change the Control type to Header Marker
The new Control will initially appear as a green dashed line, just like a regular section. Click it and, in the left-hand menu, change the Control Type from Section Break to Header Marker.
Everything between the Header Marker and the next section or marker will be treated as part of your header.
3. Why do you need a Header Marker?
If you don’t add a Header Marker, the elements above your first Section Break will be visible on your main page but will disappear when visitors navigate to another section.
This can be a problem if your navigation menu is located in the hero area. Visitors need to be able to access your navigation and move between sections or return to the main page. A Header Marker tells Carrd that these elements should remain available when navigating between sections.
4. Create your footer
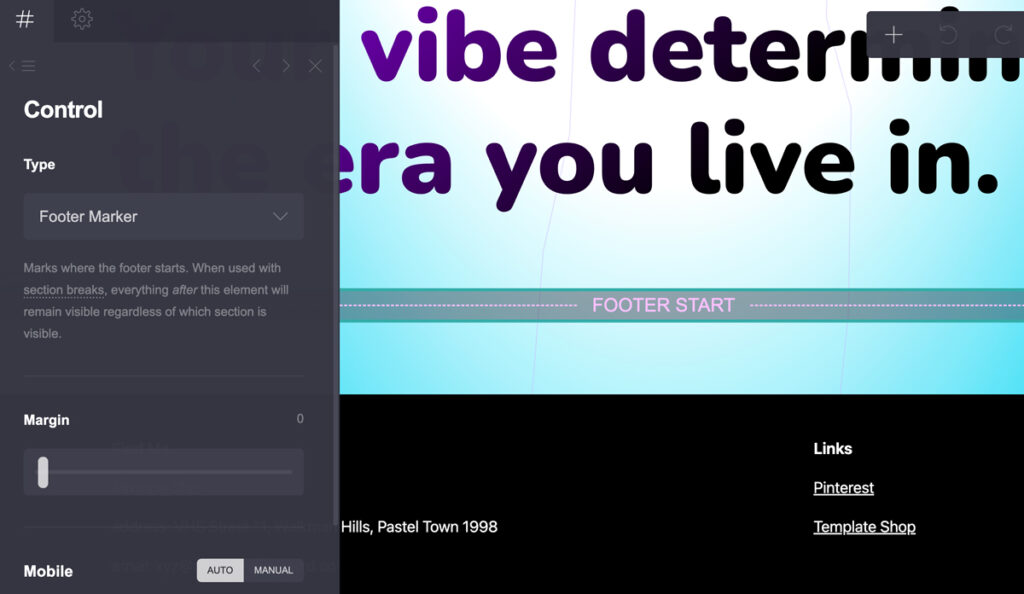
You can create the footer using the same method. Add another Control element where you want your footer to begin and change its Control Type to Footer Marker.
Your footer can contain elements such as copyright information, social links, contact details, or additional navigation. Like the header, it remains available when visitors navigate between sections.
5. Keep your header and footer structure simple
There are a few important rules to keep in mind when using Header and Footer Markers. You can have one header and one footer, and you should not place regular sections inside the header or footer area.
You also shouldn’t place a new Section Break directly next to a Header or Footer Marker. Make sure there is some content between the markers and your next section so Carrd can correctly determine where each area begins and ends.
Following this structure will help Carrd correctly identify your header, individual sections, and footer when visitors navigate through your site.
Carrd Sections vs. Scroll Points
Sections and Scroll Points are both created using the Control element, but they serve different purposes. A section divides your website into a separate navigable area, while a Scroll Point simply marks a specific position on the page that visitors can jump to.
When to Use Sections
Use sections when you want to divide your website into distinct areas such as About, Services, Portfolio, or Contact. You can give each section its own ID and link buttons or other elements to it.
For example:
About → #about
Portfolio → #portfolio
Contact → #contact
When visitors click the link, Carrd opens the corresponding section.
When to Use Scroll Points
Use a Scroll Point when you want a link to take visitors to a specific position within the same page without creating a separate section.
For example, imagine you have a long landing page with several blocks of content. You might want a button near the top to take visitors directly to your pricing table further down the page. A Scroll Point lets you mark exactly where you want the page to scroll to.
To create one, add a Control element and change the Control Type from Section Break to Scroll Point in the left-hand menu.
You can also adjust the Scroll Point settings from the same menu. Depending on your Carrd setup, you can change options such as the scroll speed and offset. The offset is useful when you want the page to stop slightly above or below the exact position of the Scroll Point, for example to prevent content from being hidden behind a fixed header.
Sections or Scroll Points?
A simple way to decide is:
Sections: Use them to create separate navigable areas of your website.
Scroll Points: Use them to jump to a specific position within an existing page.
If you are building a one-page website with navigation such as About → Services → Portfolio → Contact, sections are usually the better choice. If you simply want to move visitors to a particular piece of content further down the same page, a Scroll Point may be all you need.
Good to know: Sections and Scroll Points may look similar in the editor, but they serve different purposes.
Sections are useful for dividing your site into distinct areas, while Scroll Points let you control exactly where visitors land when following an anchor link.
How Many Sections Can a Carrd Have?
Carrd does not set a separate limit on the number of sections you can create. You can keep adding Section Breaks to divide your site into as many sections as your site structure requires. Carrd’s documentation simply instructs you to repeat the process whenever you want to create another section.
However, there is an important difference between the Free Basic plan and Pro plans. Sections are created using the Control element, and Controls count toward your site’s total element limit.
On the free Basic plan, a site can contain up to 50 elements. This includes your Controls as well as buttons, text, images, containers, and other elements. On Pro plans, there is no element limit, so you have much more freedom when building larger and more complex sites.
This means there is no simple answer such as “you can have 10 or 20 sections.” The practical limit depends on how many elements your entire site contains and how complex each section is.
For example, a simple site with four sections might use relatively few elements, while a portfolio with many images, text blocks, buttons, and containers can reach the Basic plan’s element limit much sooner.
If you are building a simple personal website or landing page, the Basic plan may be enough. For a larger site with many sections and more complex layouts, a Pro plan gives you unlimited elements and therefore much more room to grow.
Tips for Organizing Carrd Sections
Once you start adding several sections to your Carrd site, keeping them organized can make the editor much easier to work with. Here are a few simple tips to help you build a cleaner and more logical structure.
1. Give every section a clear and unique ID
Use short, descriptive names such as #about, #services, #portfolio, and #contact. Avoid spaces, duplicate names, or IDs that are difficult to remember. Clear IDs also make it easier to create and troubleshoot your navigation links.
2. Plan your section order before adding too much content
Think about how visitors should move through your website. A simple structure such as Hero → About → Services → Portfolio → Contact usually makes navigation easier to understand.
3. Use drag and drop to rearrange sections
You don’t have to delete and recreate a section if you decide to change your layout. You can simply drag the Control element and move the section to a different position.
4. Keep your navigation consistent
If you have several sections, make sure your navigation links use the correct section IDs. For example, your About button should link to #about, your Portfolio button to #portfolio, and so on.
5. Keep Header and Footer Markers in the correct position
Remember that Header and Footer Markers determine which content belongs to these areas. Avoid placing regular Section Breaks inside the header or footer and make sure there is enough content around your markers for Carrd to identify the different areas correctly.
6. Test your section links after publishing
Previewing your site in the editor is useful, but always test your navigation on the published version as well. Click through every section link and check that visitors are taken to the correct place. It is also worth testing the navigation on mobile, especially if your header contains several buttons.
7. Don’t create sections when a Scroll Point is enough
Not every navigation link needs its own section. If you only want to move visitors to a specific part of the same page, a Scroll Point may be a simpler solution. Use sections when you actually want to create separate navigable areas of your site.
Carrd Sections Not Working? Common Fixes
If your Carrd sections are not working as expected, check these common issues before rebuilding your page.
The section link does nothing
Check that the section has a unique ID and that the link uses the exact same name. For example, a section named #about should be linked using #about in the element’s URL field.
Your section opens, but the wrong content appears
Check the placement of your Section Breaks and make sure each section contains the content you expect. It can also help to switch the editor to the sections view to see how Carrd has divided your page.
Your header disappears when you open a section
If your navigation is part of the hero area, make sure you have added a Header Marker. Without one, elements above your first Section Break may disappear when visitors navigate to another section.
All your sections appear on the main page
Check the placement and type of your Control elements. Make sure you are using Section Breaks where you actually want to create separate sections, and check that your Header and Footer Markers are positioned correctly.
Your section works in the editor but not after publishing
Save and republish your site, then test the links on the live version. Also check that the section ID and URL match exactly. If you are testing on a custom domain, try the published Carrd URL as well to determine whether the problem is related to the site itself or the domain setup.
Your navigation works but doesn’t scroll to the right position
If you are using a Scroll Point rather than a Section Break, check its offset and scroll speed settings. An offset can be useful when you have a fixed header that would otherwise cover the content you are linking to.
Conclusion
Carrd sections are a simple way to organize a one-page website and make it easier for visitors to navigate between different areas. With sections, you can also make a one-page site feel more like a multi-page website, while keeping all your content within a single Carrd site.
Once you understand how Section Breaks, Header and Footer Markers, and Scroll Points work, you can create a more structured and user-friendly Carrd site. Remember to give your sections clear IDs, keep their placement logical, and always test your navigation after publishing.