

If you are new to Carrd, this beginner-friendly tutorial on how to use Carrd will help you learn the basics. It covers how to use the editor, work with website elements, buttons, and sections, adjust mobile settings, and publish your website. The guide will take you from a blank page or your chosen starter template to the final stages of previewing and publishing your site.
Before you start designing, decide what your page needs to achieve. A simple structure will make the editing process much easier.
Create a Carrd Account
In order to access the Carrd editor, you need to create a free Carrd account. Just visit the official Carrd website and click on “Choose a Starting Point” or “Log In.” If you choose the first option, you will be taken directly to the Carrd editor. From there, you can start with a blank page or choose a template. However, keep in mind that if you want to publish the page later, you will need to create an account.
If you decide to click on “Log In,” a new window will open with a “Sign Up” button. Click on it, and you will be asked to enter your name, email address, and password. Then, simply click “Sign Up.”

Choose a Template / Start From Scratch
After clicking the “Choose a Starting Point” button, you will be taken to a new screen where you can choose a template or start with a blank page. Available templates are divided into five categories: Profile, Landing, Form, Portfolio, and Sectioned.
If you are new to Carrd, using a template is usually the easiest way to get started. A template gives you a ready-made structure that you can customize with your own text, images, colors, fonts, and other elements. If you prefer complete creative control, you can choose a blank page and build your website from scratch.
Learn the Carrd Editor
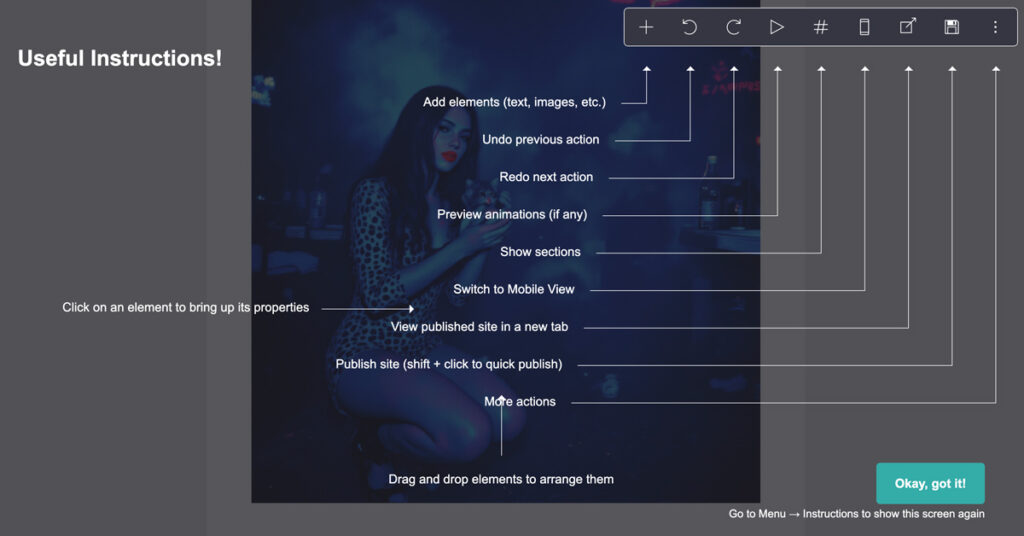
After accessing the Carrd editor, you will be greeted by an instruction screen. You can access it again at any time from the menu in the top-right corner.
The Carrd editor is quite simple to use. The main menu in the top-right corner contains seven buttons:
- Plus icon– lets you add text, images, audio, buttons, links, lists, tables, and other elements.
- Back arrow – lets you undo your previous action.
- Forward arrow – lets you redo an action.
- Play icon – lets you preview animations.
- Mobile view icon – lets you switch between desktop and mobile views.
- Save/Publish icon – gives you access to saving and publishing options.
- Three dots – opens a menu with additional actions and settings.
Some icons only appear after you add certain elements to the site, such as Sections or Scroll Points. You may also need to publish your site to see the icon that lets you preview the published version.
Whether you choose a template or start with a blank page, your site will already contain some elements. Even a blank page includes basic text elements, such as a title and another text element below it. These elements are contained within the Page element.
When you click on the Page element, a dedicated editing menu appears on the left side of the screen. The same happens when you select any other element. Each element has its own settings and customization options, which you can access from the left-hand menu. You can also click on the top arrows in this menu and it will switch its position with the right top menu.
Add & Customize Elements
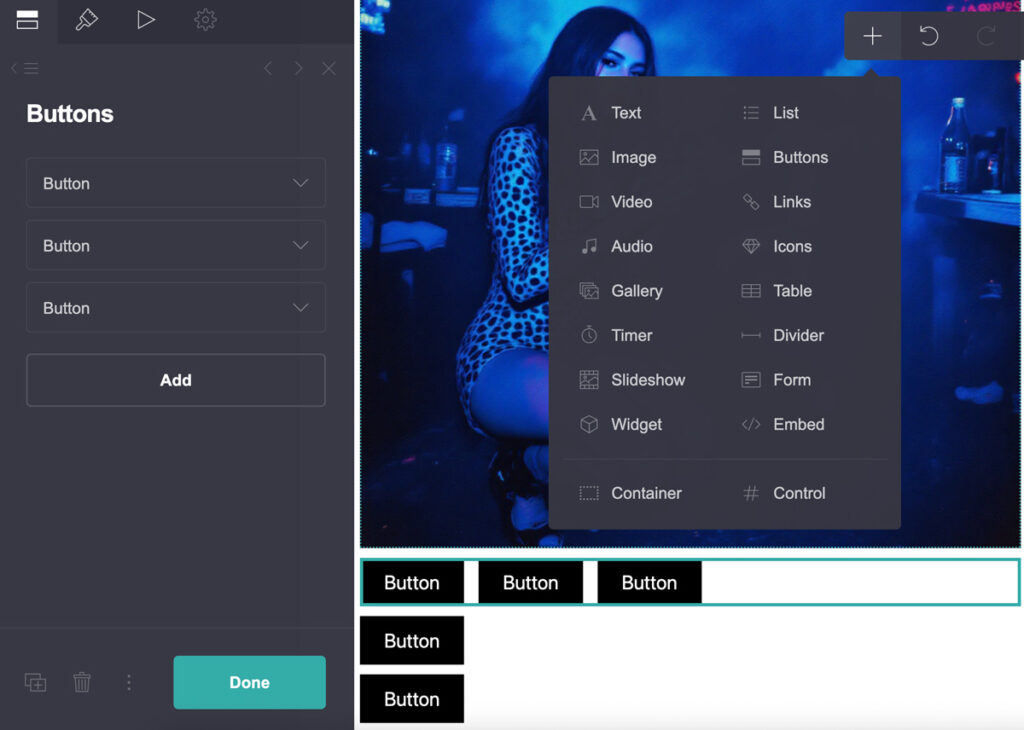
To add a new element, click the Plus icon in the top-right corner. A new pop-up window will appear. If you are using the Free plan, some options will be marked with a yellow lock. The Free plan allows you to add elements such as text, images, videos, audio, galleries, timers, lists, buttons, links, icons, tables, dividers, containers, and controls. Carrd Paid plans also give you access to slideshows, forms, widgets, and embeds.
To add an element to the page, simply click on the element you want. Keep in mind that the new element will be added after the element you have selected. You can then click on the new element, and a dedicated menu will appear on the left.
The menu has some icons at the top. The first one contains the main settings for the specific element. For example, for a text element, you can enter and edit the text, while for an image element, you can upload your desired image.
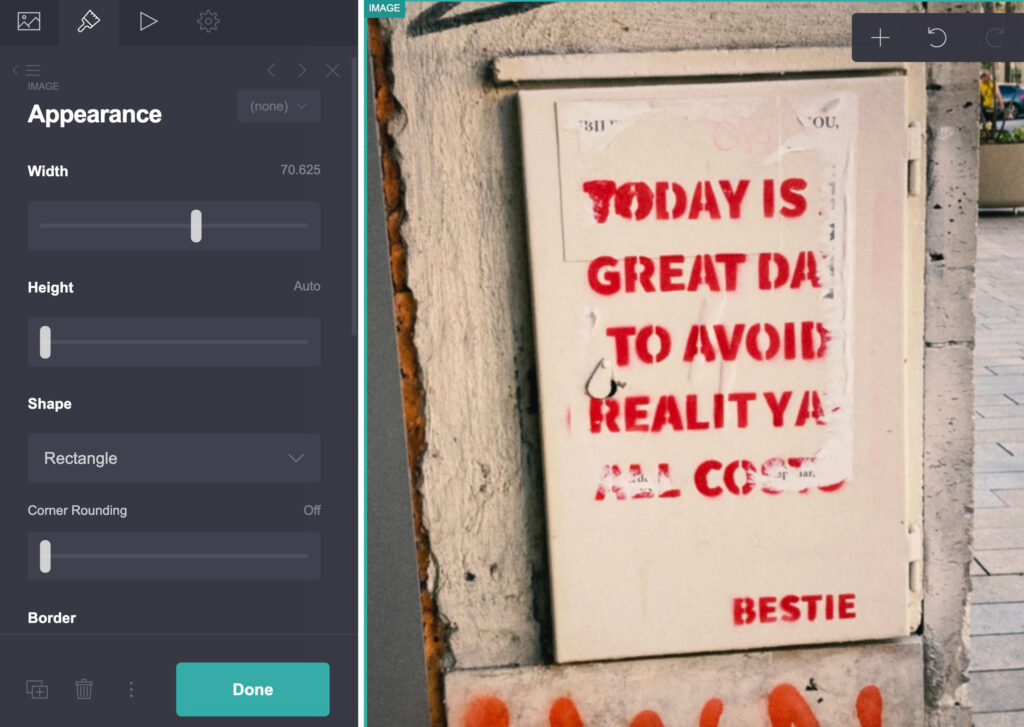
The next icon is the Brush. It lets you change the appearance and design of the element. Depending on the element, you can adjust the color, font, size, weight, borders, shadows, margins, and alignment. The bottom section contains options for mobile optimization. You can leave the settings on Auto or switch to Manual to set your own parameters for the mobile version of the page.
The third icon is the Play button, which provides access to animation settings. The last icon is the circular icon, which opens additional settings such as the element ID, style, events, and classes. These options are available only to paid users and are mainly useful for users with some basic coding knowledge who want more control over their website.
At the bottom of the left-hand menu, you will also find two additional icons. The first one lets you duplicate the selected element, while the trash icon lets you delete it.
You can also quickly change the order of elements on the page using drag and drop. Simply click and hold an element, then drag it to the desired position.
How to Use Buttons on Carrd
To add a Button element in Carrd, click Button in the Plus menu in the top-right corner. The button will appear on your page, and you can customize it from the left-hand menu.
You can:
- Change the label – replace the default text with your own.
- Add a URL – link the button to a website, email address, phone number, section, or another supported action.
- Change the color – customize the button, label, hover, and border colors.
- Add more buttons – click Add below the existing Button element.
You can further customize the button’s appearance using the Brush icon. Here you can change the button style, colors, size, typography, spacing, corner rounding, alignment, and mobile settings. You can also add animations using the Play icon.
For more detailed information about button styles, layouts, links, animations, and advanced settings, see my guide on How to Add and Customize Buttons in Carrd.
How to Use Sections in Carrd
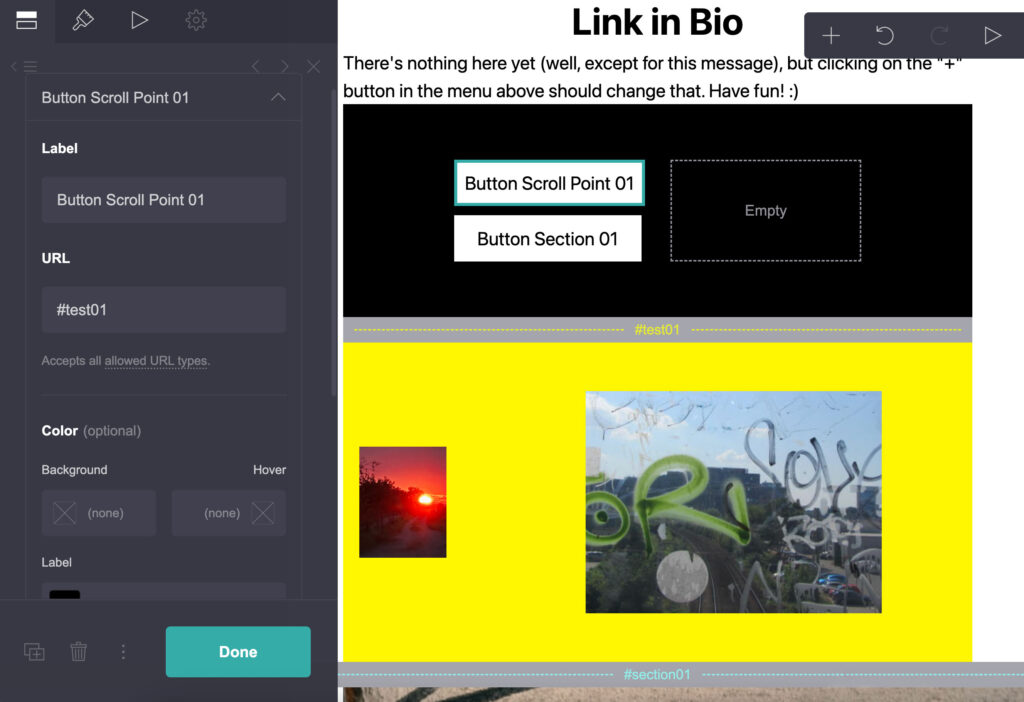
Carrd’s Section feature lets you divide a one-page website into separate, navigable areas. You create sections using the Control element and can then link buttons, text, or other elements to a specific section.
Sections can also make a one-page website feel more like a multi-page site. For example, you can create separate sections for About, Services, Portfolio, and Contact, while keeping everything within the same Carrd site.
To create a section, click Control in the Plus menu and choose Section Break. You can then give your section a unique name and use its ID, such as #about, to link other elements to it.
The Control element also includes options such as Header Marker, Footer Marker, and Scroll Point, which serve different purposes when organizing and navigating your page.
For a detailed explanation of how to create, link, organize, and troubleshoot Carrd sections, see my Carrd Sections guide.
Other Carrd Elements
Some of the other elements available in Carrd can be grouped into the following categories:
- Content: text, images, videos, audio, galleries, and timers
- Navigation: lists, buttons, and links
- Layout and visual elements: icons, tables, and dividers
- Paid elements: slideshows, forms, widgets, and embeds
Separately, next to the Control element, you will find the Container element. Containers let you organize other elements into responsive layouts with two, three, four, or five columns. Containers are useful when you want to place elements side by side or create more complex page layouts. You can also adjust their spacing, alignment, and layout settings to control how they appear on different screen sizes.
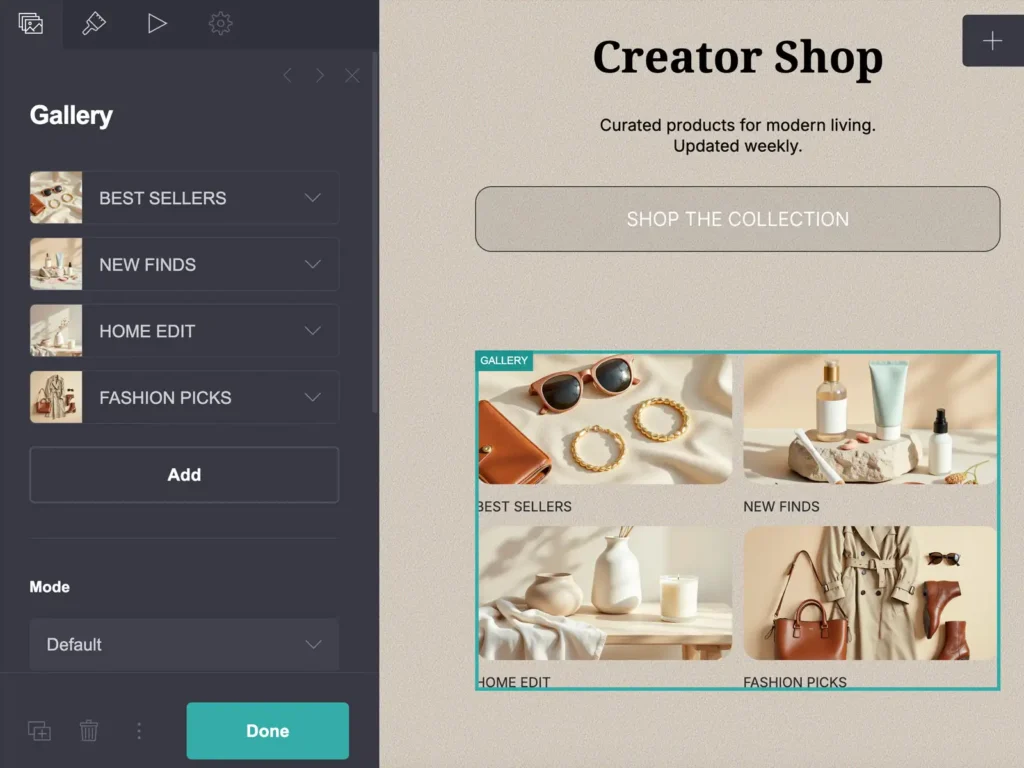
Containers control how elements are grouped and positioned. If your layout looks wrong, check the container settings before adjusting individual elements.
Mobile-Friendly Design
If you want to edit and optimize your website for mobile devices, you can access the mobile settings for each element from the left-hand menu. Simply click the element on the page and select the Brush icon at the top of the left-hand menu. Then scroll down to the Mobile section.
The default setting for mobile is Auto. You can switch to Manual and make adjustments specifically for the mobile version of each element.
To check how your changes look on mobile, select the mobile icon in the top-right menu. The editor will switch to mobile view, allowing you to preview your website on a smaller screen. Pay particular attention to font sizes, spacing, image sizes, and buttons when checking the mobile version, as these elements can look quite different on a smaller screen.
Keep in mind that the result may not look exactly the same on every mobile device because screen sizes and proportions vary. However, the overall layout should remain consistent across different screen sizes.
Always check your design in Carrd’s mobile view before publishing. Some layouts that look fine on desktop may need manual adjustments on smaller screens.
Preview & Publish
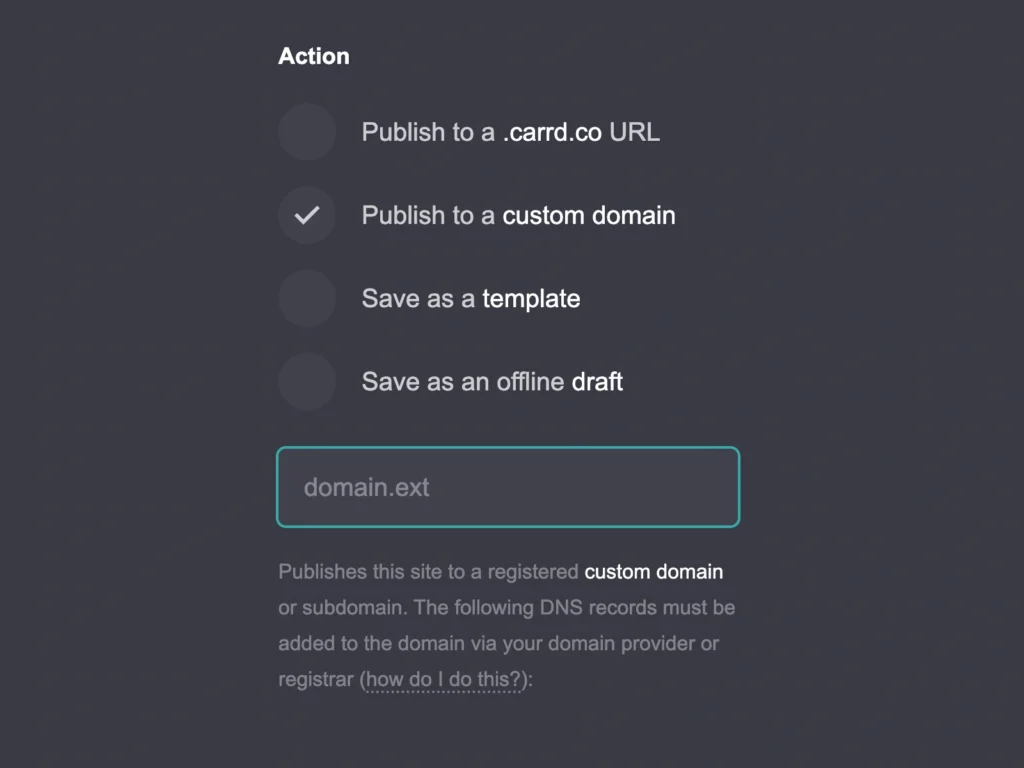
If you are satisfied with the final design of your page, you can proceed to save and publish it. Click the Save/Publish icon in the top-right menu. In the left-hand menu, you can enter a page title and description. You can then choose from several options:
Publish to a Carrd Subdomain
If you don’t have a paid plan or don’t want to use your own domain, you can publish your website to a Carrd subdomain. You will need to choose a name that will appear before the Carrd subdomain. An SSL certificate is automatically enabled for sites published on Carrd subdomains.
Publish to a Custom Domain
If you already own a domain or want to purchase one, you can publish your site to a custom domain. Keep in mind that Carrd does not sell domains, so you need to purchase one separately from a domain registrar.
Enter your domain in the appropriate field and follow Carrd’s instructions for updating your DNS records. Once the DNS changes have been configured correctly, an SSL certificate will be automatically issued for your site.
Save as a Template
Choose this option if you want to save the current design and structure as a starting point for future websites.
Save as an Offline Draft
If you are not yet satisfied with your website, its design, or the information it contains, you can save it as an offline draft and continue working on it later.
After choosing one of the options above, click Save Changes. If you publish your website to a Carrd subdomain or custom domain, you can then visit it live and make additional changes if you notice any errors or want to update the content.
Is Carrd Easy to Use?
Carrd is relatively easy to use, especially if you are creating a simple one-page website. The editor is straightforward. You can add and customize most elements without coding knowledge. Once you understand how elements, containers, and sections work, you can build and publish a website quite quickly.
Carrd offers a simple way to create a professional-looking website without the complexity of a traditional website builder. Whether you start with a template or build from scratch, the basic workflow is straightforward: add and customize your elements, optimize the design for mobile, preview your page, and publish it. As you become more familiar with the editor, you can gradually explore Carrd’s more advanced features and customization options.